

It’s not just a catchy ad slogan: It’s true. Unless you have dozens of employees or numerous exceptions each payday, you can literally process a payroll run in just a few minutes using the employee compensation tools in QuickBooks.
No matter which version of desktop QuickBooks you’re using, payday chores are similar. Even if you’ve subscribed to Full Service Payroll and are having most of the work done by Intuit, you still have to enter the number and type of hours worked for each pay period.
If you’re doing payroll manually or through a payroll service, you might be surprised at how quickly and easily your payroll tasks can be completed once you’ve finished entering information about your company and its employees, taxes and deductions.
A Simple Process
When you get a reminder that it’s time to run payroll, go to Employees | Pay Employees and choose Scheduled Payroll to get to this window:
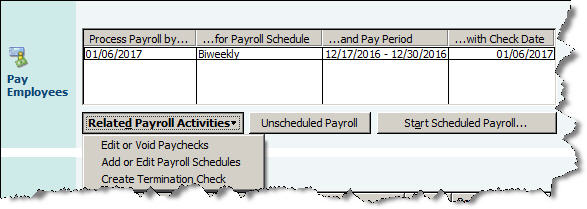
Figure 1: No matter how many payrolls you’ve run, it’s important to verify that these dates are correct.
When you click Start Scheduled Payroll, a new screen displays your employee list in a spreadsheet grid. By default, QuickBooks displays several columns, including Employee, Regular Pay and Sick Hourly; you can opt to include others, like Employee Number. If you hide columns that contain information, that data will still be used in paycheck calculation. Then:
- Verify that the information at the top of the screen is correct (Payroll Schedule, Bank Account, etc.).
- Make sure that all employees to be paid have check marks next to their names.
- Enter the number of hours worked for each hourly employee, placing them in the correct pay type column.
Select one and click Open Paycheck Detail to see a complete breakdown of compensation and withholding — all calculated automatically by QuickBooks based on your setup data — within the Preview Paycheck screen. Close the window when finished.
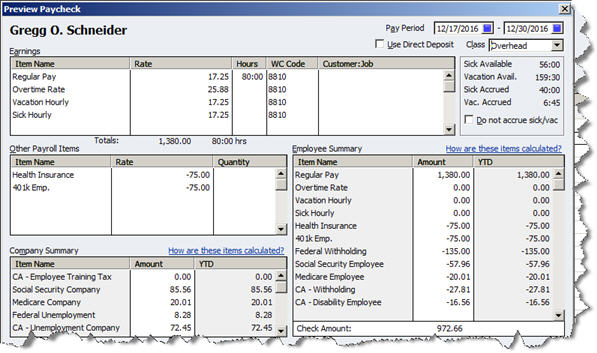
Figure 2: The Preview Paycheck screen shows the numbers behind the check amount.
Checking Your Work
If you’re satisfied that everything is correct, click Continue. In the next screen, you’ll verify Payroll Information again and check a box to indicate whether checks will be printed or handwritten (you can assign a starting check number to the latter). QuickBooks displays a grid containing each employee’s total gross pay, total taxes and deductions, net pay, employer taxes, contributions and total hours. The Direct Deposit field will be checked if the individual is signed up.
If you’re not sure that your payroll information is correct, you can click Finish Later, otherwise, select Create Paychecks.
The Final Step
QuickBooks will then display your results:
Figure 3: Once you’ve previewed and approved a payroll, you can simply click to print any paper checks and pay stubs.
Check the box at the bottom of this window next to Do not advance the dates of this payroll schedule in the Payroll Center if you still have employees to process for this run. If the box isn’t checked, QuickBooks will change the dates in the Pay Employees window to reflect your next pay period.
When you select Print Paychecks or Print Pay Stubs, the selection window opens. You can toggle among views of Paychecks, Direct Deposit or Both. Select the ones you want to dispatch and click Print or E-Mail. You’ll have the option to reprint any checks if you need to; otherwise, click OK.
Figure 4: Click Preferences in the print selection window to customize paycheck vouchers and pay stubs.
No Room for Errors
Sounds simple, and it is — as long as your setup was error-free. As you well know, you can’t make mistakes running payroll or you’ll initiate a whole series of incorrect numbers, making employees, benefits providers and government agencies unhappy.
So do not proceed if something doesn’t look right; QuickBooks always gives you an out. And let us know how we can help with setup, taxes or payroll runs — or anything in between.