

We are living in a period of “accelerated change”. Indeed, the ground does seem to be shifting beneath us almost faster than we can comprehend, so it’s important to stay nimble in these difficult times.
One way you can do so is to closely manage your prices. In some cases you may need to ratchet your prices up to cover a commodity cost-spike. Or, you may want to offer special deals to your best customers to help retain their business.
In this article we’ll discuss four methods you can use to manage prices (and change) within QuickBooks.
Create Discount Calculations
Studies have shown that it’s far easier to get additional sales out of existing customers rather than from new customers. Targeted discounts are just one way to try to encourage your customers to buy more.
However, if you do offer a discount, don’t just type over your standard prices on the QuickBooks invoice, create a discount calculation instead. This accomplishes two things:
- Your customers see on their invoice exactly how much of a break you’ve given them.
- You can track how successful your campaign was.
It’s easy to set up a discount calculation:
- Choose Lists, and then Item List.
- Click the Item button, and then choose New from the menu (or press Ctrl+N).
- As shown in Figure 1, Choose Discount from the Type list.
- Assign an item name, complete the description field, and then enter an amount or a percentage.
- Choose an account from the list-you may wish to create a separate account so that you can easily track the amount of discounts that you’ve offered.
- Choose Tax or Non-tax to indicate whether the discount is applied before or after sales tax, and then click OK.
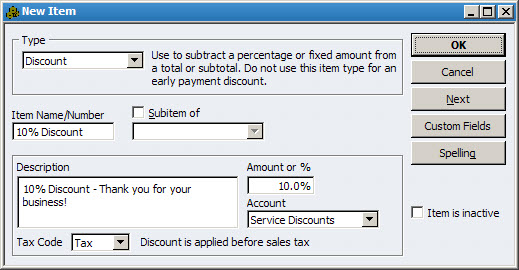
Figure 1: A discount item allows you to create and track percentage or amount based discounts.
Keep in mind that discounts only apply to the previous row of the invoice or sales receipt. To apply the discount to multiple items, you must create a Subtotal item:
- Choose Lists, and then Item List.
- Click the Item button, and then choose New from the menu (or press Ctrl+N).
- Choose Subtotal from the Type list, and then assign an Item Name and Description, as shown in Figure 2.
Figure 3 shows a multi-line invoice, along with a subtotal and a discount on all of the items.

Figure 2: A subtotal item allows you to apply a discount to multiple items on an invoice or discount.
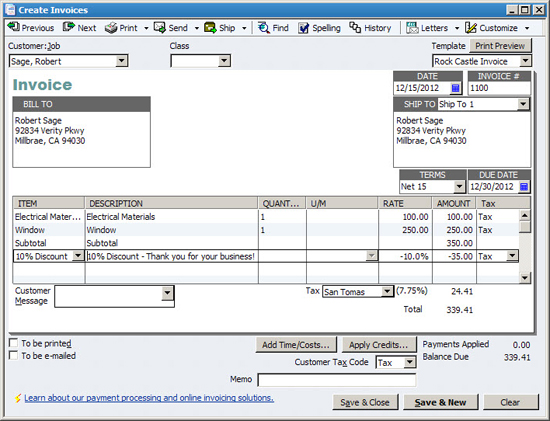
Figure 3: Include a subtotal on your invoice when you wish to discount multiple items.
Use Price Levels
Price negotiations are becoming more prevalent and you may find that you have to offer a standard discount to one or more customers in order to keep their business.
In such cases, you might find the price level feature helpful, so that you don’t have to remember to include a discount item on each invoice:
- Choose Lists, and then Price Level List.
- Click the Price Level button, and then choose New (or press Ctrl-N).
- As shown in Figure 4, assign a name to the price level, such as 10% Discount.
- QuickBooks Pro users can only establish Fixed % price levels, which are applied globally to all products. QuickBooks Premier and Enterprise users also have the option to create Per Item discounts, where you can selectively discount only certain items.
- Specify whether to increase or decrease item prices, and optionally choose a rounding method.
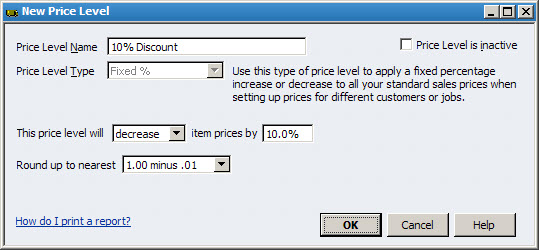
Figure 4: Price levels allow you to apply automatic discounts to everything a customer purchases.
Note: You can use price levels to increase or decrease prices.
Change Item Prices
Competitive or other pressures may mean that you need to globally change all of your prices at once. Fortunately, you can use the Change Item Prices feature to do so:
- Choose Customers, and then Change Item Prices.
- As shown in Figure 5, select an Item Type from the list, and then select the items you wish to change, or click the Mark All checkbox.
- Indicate a percentage or dollar amount to increase prices by. This can be based on the current price or current cost of the item. Enter a positive number to increase the price, or negative number to decrease the price.
- Click the Adjust button to see the impact of your changes in the New Price column, and then click OK to make the changes permanent.
Timesaver: You can also manually fill-in the New Price column if you prefer to make targeted adjustments to selected items. This is easier than manually opening each item one at a time.
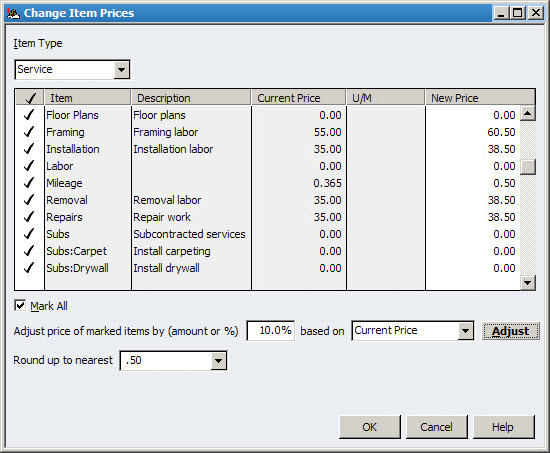
Figure 5: The Change Item Prices feature allows you to adjust multiple prices at once.
Add a Surcharge
We’re fortunate that gas prices are currently far less than were they were just a few months ago. However, who knows how far they may go this summer during peak driving season.
At some point you may need to consider adding a fuel or other type of surcharge to help recover costs beyond what you’ve factored into your existing prices:
- Choose Lists, and then Item List.
- Click the Item button, and then choose New from the menu.
- As shown in Figure 6, choose Other Charge from the Type list.
- Assign an item name, complete the description field, and then enter an amount or a percentage.
- Choose an account from the list, and then click OK. As shown, you may wish to create a separate account so that you can easily track the amount you earn from the surcharge.
Important: As with discounts, Other Charge items only apply to the preceding row on an invoice or sales receipt. Be sure to add a Subtotal item to your invoice if you want the surcharge to apply to multiple rows of your invoice or sales receipt.

Figure 6: The Other Charge feature allows you to compute fuel and other surcharges.