

Whether you’re selling one-of-a-kind items or stocking dozens of the same kinds of products, you need to create records for each. When it comes time to create invoices or sales receipts, your careful work defining each type of item will:
- Ensure that your customers receive correct descriptions and pricing,
- Provide the information you must know about your inventory levels, and,
- Help you make smart decisions about reordering.
You’ll start this process by making sure that your QuickBooks file is set up to track inventory. Open the Edit menu and select Preferences, then Items & Inventory. Click the Company Preferences tab and click in the box in front of Inventory and purchase orders are activated if there isn’t a check in the box already. Here, too, you can ask that QuickBooks warn you when there isn’t enough inventory to sell. Click OK when you’re finished.
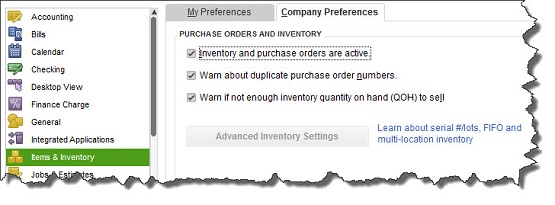
Figure 1: You need to be sure that QuickBooks knows you’ll be tracking inventory before you start making sales.
To create your first item, open the Lists menu and select Item List. Click the down arrow next to Item in the lower left corner of the window that opens and select New. The New Item window opens.
Warning: You must be very precise when you’re creating item records in order to avoid confusing your customers and creating problems with your accounting down the road. Please call us if you want us to walk you through the first few items.
QuickBooks should display the list of options below TYPE. Since you’re going to be tracking inventory that you buy and sell, select Inventory Part. Enter a name and/or item number in the next field. This is not the text that will appear on transactions; it’s simply for you to be able to recognize each item in your own bookkeeping.
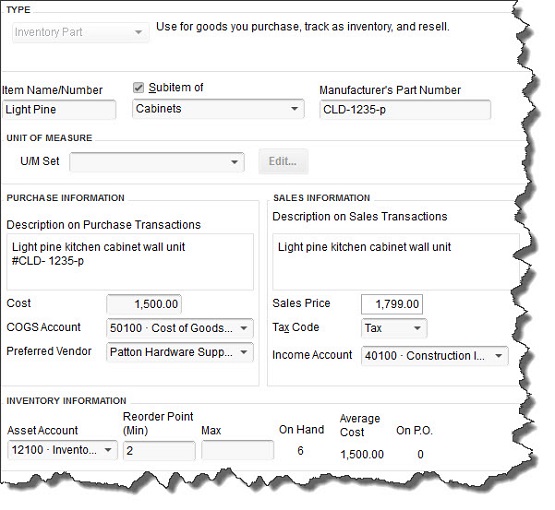
Figure 2: Let us work with you if you have any doubts about the data that needs to be entered in the New Item window. It must be 100 percent accurate.
In the example above, the box next to Subitem of has a check mark in it because “Light Pine” is only one of the cabinet types you sell (you can check this box and select if you want to create a new “parent” item on the fly). Leave the next field blank if your item doesn’t have a Part Number, and disregard UNIT OF MEASURE unless you’re using QuickBooks Premier or above.
Fill in the PURCHASE INFORMATION and SALES INFORMATION fields (or select from the lists of options). Keep in mind that the descriptive text you enter here will appear on transaction forms, though customers will never see what you’ve actually paid for items, of course (your Cost, as opposed to the Sales Price).
QuickBooks should have automatically selected the COGS Account (Cost of Goods Sold), but you’ll need to specify an Income Account. Please ask us if you’re not sure, as this is a critical designation. The Preferred Vendor and Tax Code fields will display lists if you’ve already set these up.
QuickBooks should have pre-selected your Asset Account. If you want to be alerted when your inventory level for this item has fallen to a specific number (Min) so you can reorder up to the point you specify in the Max field, enter those numbers there (the Inventory to Reorder option must be turned on in Edit | Preferences | Reminders).
If you already have this item in stock, enter the number under On Hand. QuickBooks will automatically calculate Average Cost and On P.O. (Purchase Order).
Click OK when you’ve completed all of the fields. This item will now appear in your Item List, and will be available to use in transactions. When you want to create, edit, delete, etc. any of your items, simply open the same menu you opened in the first step here (Lists | Item List | Item).

Figure 3: The Item menu, found in the lower left corner of the Item List.
Precisely created Inventory Part records are critical to accurate sales and purchase transactions. So use exceptional care in building them.