

Day-to-day transactions like receiving payments from customers or paying vendors occur so frequently that most QuickBooks users do them automatically. However, from time to time you may encounter an infrequent transaction that will stop you in your tracks. In this article we’ll discuss several common tricky transactions and offer advice on how to handle them.
Security Deposits
Security deposits, such as for a rental space or to a utility company, require special tracking so that you can be sure to get the money back later. It’s best to maintain a separate account for each security deposit so that you can track each individually. If you have numerous security deposits, consider creating individual subaccounts for each deposit:
- Choose Lists, and then Chart of Accounts (or press Ctrl-A).
- Click the Account button, and then choose New (or press Ctrl-N).
- As shown in Figure 1, choose Other Account Type, Other Current Asset, and then click Continue.
- Assign an Account Name such as Contributions from Owner, (and account number if applicable). If necessary, click Subaccount Of, and specify the Deposits account. Click Save and Close to save the new account.
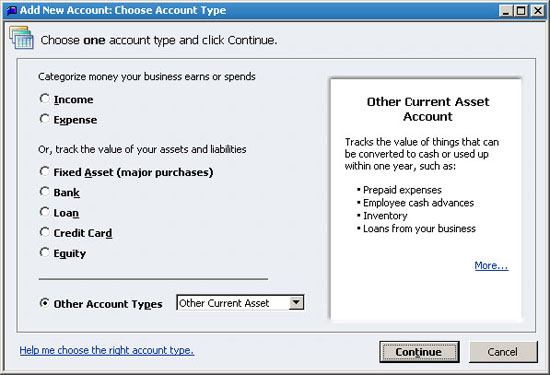
Figure 1: An easy way to manage security deposits is to post them to a new Other Current Asset account.
Refunds from utility companies, insurance companies, or other sources
Choose Banking, and then Make Deposits. Specify the vendor, and then choose the account. In the case of deposit refunds, you should have an asset account that you’ll apply the money against, as shown in Figure 2. For other types of refunds, use the expense account from which you originally paid the money.
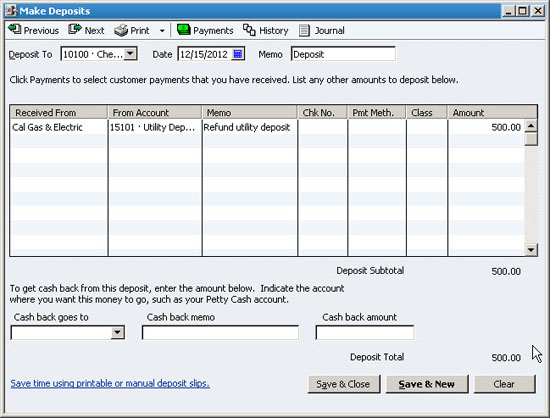
Figure 2: Apply utility deposit refunds back to the deposit account on your balance sheet.
Owner Contributions
This is a situation where an owner of the company invests money into the firm. The owner does so in hopes of making a return on their investment, but does not have a specific timetable in mind for repayment of the loan. If you don’t already have a Contributions from Owner account, follow these steps described previously for creating a new account, but choose Equity and name the account Contributions from Owner.
Distributions to Owner
Distributions allow an owner to take profits out of the company on a non-salary basis. Distributions can be paid through payroll or on a separate check. Your chart of accounts should already include a Distributions to Owner account, but if it doesn’t, you can establish this new Equity account, which you can then use in either of these types of transactions.
- Payroll: Distributions require special treatment in payroll because they’re not subject to income or payroll taxes in QuickBooks. The owner settles the income tax due when filing their annual return. Before you can pay distributions through payroll you must establish a payroll item. To do so, follow these steps:
- Choose Employees, Manage Payroll Items, and then New Payroll Item.
- Choose Custom Setup, and then click Next.
- Choose Addition, and then click Next.
- Enter the word Distribution and then click Next.
- Choose the Distributions to Owner account from your chart of accounts, and then click Next.
- Choose None for the Tax Tracking type, and then click Next.
- Leave all of the taxes unselected, and then click Next.
- Choose Calculate This Item Based on Quantity and then click Next when the Calculate Based on Quantity screen appears.
- Accept the default choice of Gross Pay and then click Next.
- Leave the Default Rate and Limit fields at zero and then click Finish.
Next, select the employee in the Employee Center, and then choose Edit Employee. Choose Payroll and Compensation Info from the Change Tabs list, and then add Distributions to the Additions, Deductions, and Company Contributions list, as shown in Figure 3. You can fill in the distribution amount now if you know the ongoing amount, or you can fill it in on the fly during the payroll process. Simply display the Paycheck Detail during the payroll process to access this field and enter the distribution amount.
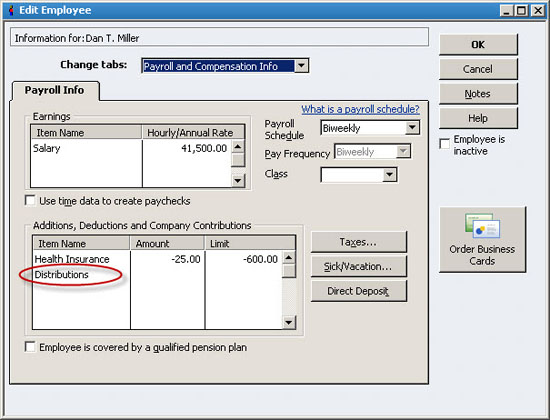
Figure 3: Add Distributions to the Additions, Deductions, and Company Contributions section.
- Separate check: A much simpler approach is to write a separate check to the owner. To do so, choose Banking, and then Write Checks. Choose the Distributions to Owner account and fill in the amount.
Loans to the Company
From time to time the owner may need to make a loan to the company. If the owner expects this money to be repaid, establish a Loan account on the chart of accounts and record the deposit of the loan to this new account.
Company Loans Money to Others
Sometimes your company may make a salary advance to an employee, or the firm may loan money to an affiliate. In such cases it’s important to always establish a separate Current Asset account for such transactions so that you can easily track the outstanding balance. Such accounts can be a subaccount of a general Loans Receivable account, as shown in Figure 4. As shown in Figure 5, you’ll code the check to that subaccount.
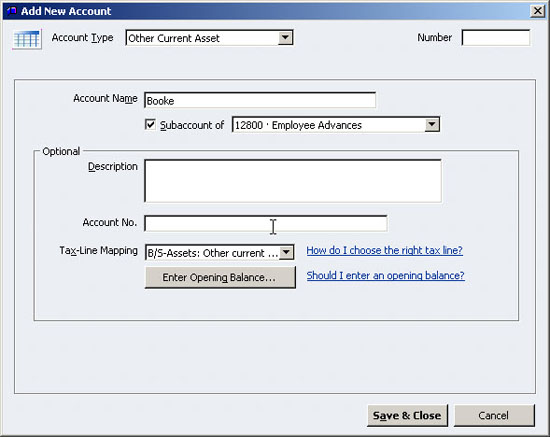
Figure 4: Make sure to create individual subaccounts for loans to employees or other parties.

Figure 5: Be sure to use the proper subaccount when issuing an employee loan.
Loan Payments
Many users struggle with loan payments because there are usually three different scenarios:
- Interest only payment: In this case there’s only one account to charge, which will be Interest Expense, as shown in Figure 6.
- Interest and principal payment: If you’re amortizing the loan over time – your payments include principal and interest – then you’ll have to charge two accounts on the transaction, both the Interest Expense and the Loan account itself, as shown in Figure 7. These amounts will be different each month. Your lender can provide an amortization table, or you can search for one for free on the Internet. Simply use the search term “amortization table” to uncover a variety of free resources, or use this search term to locate an Excel-based solution: “amortization table site:microsoft.com”
- Extra principal payment: Extra principal payments being submitted on a separate check should be applied directly to the Loan account.
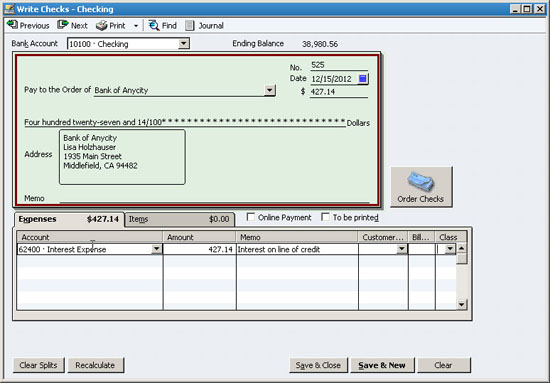
Figure 6: Interest-only loan payments post directly to the Interest Expense account.
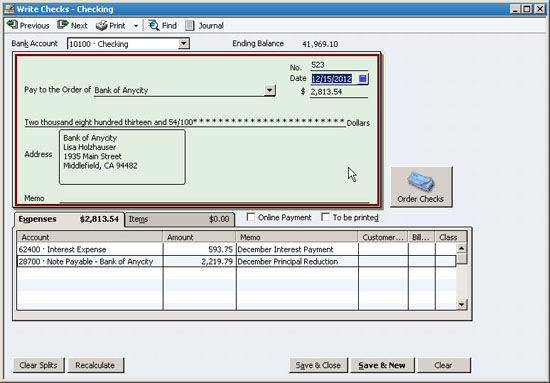
Figure 7: Make sure to break out principal and interest when a loan payment reduces the outstanding balance.
Expert tip: You can use the QuickBooks Account Reconciliation feature to reconcile your loan balance with the periodic statement that you receive from your lender. This ensures that your financial statements are correct, and helps you confirm that the lender is applying your principal payments correctly.
Petty Cash
Many offices keep a small amount of cash on hand to simply accounting for activities like running to the post office to buy stamps or make small purchases for the office. To establish a petty cash fund, you first write a check to Cash, which you then exchange for money at your bank. Let’s say that you establish a $100 petty cash account, and need to replenish it to cover three purchases:
- Lunch for the office: $24.72
- Postage stamps: $44.00
- Office supplies: $23.18
In QuickBooks, you would choose Banking, Write Checks, and then write another check to Cash, and code it to the corresponding expense accounts for the three purchases.
Expert tip: Petty cash is easily subjected to abuse, so be sure to require receipts for all petty cash transactions.